Add identity or autoincrement to table in Snowflake
- How-Tos FAQs
- November 22, 2021

In this tutorial, we will look at two different ways to add an autoincrement or identity column to an existing table in Snowflake. We will also discuss the limitations and drawbacks to each method.
In Snowflake, you can set the default value for a column, which is typically used to set an autoincrement or identity as the default value, so that each time a new row is inserted a unique id for that row is generated and stored and can be used as a primary key.
You can specify the default value for a column using create table or alter table .
However, if you try to alter a table to add an autoincrement column that already has data in it, we will get an error in Snowflake. This is not supported in Snowflake, due to the underlying architecture.
It’s not as easy as altering the existing table, but there are two ways we can add an identity or autoincrement column to an existing table.
Method 1: Using autoincrement or identity as a default value.
First we are going to create a simple table that we want to add an identity/autoincrement field to:
create or replace table colors as
    select name
    from (values ('blue'),('red'),('green')) colors (name);
Next we create a new table with the same structure as the existing table and add an idenity column.
create or replace table identity_column_example like colors;
alter table identity_column_example add column id int identity(1,1);
We specified the default value in bold below:
id int identity(1,1) not null
The table we created is empty, so let’s now create a table with some data and insert that data into just the color column:
create or replace table colors as
    select name
    from (values ('blue'),('red'),('green')) colors (name);

insert into identity_column_example(color)
    select name from colors;
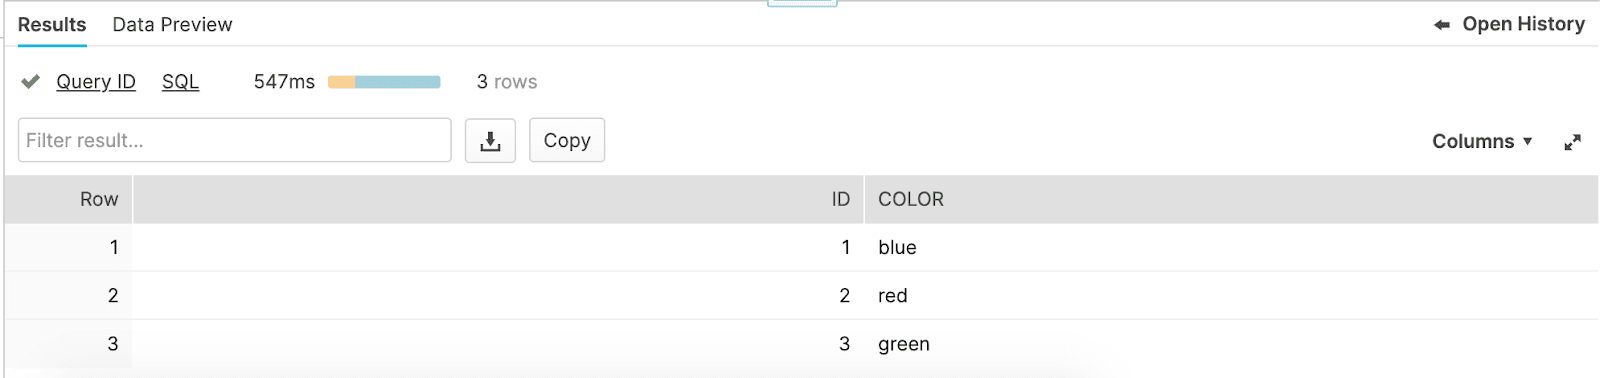
Now when we execute select * from identity_column_example order by id we see that the id column is populated and incremented by 1 each row.
The identityautoincrement columns take two optional parameters:
- start the starting value of the column
- increment the specific amount to increment each row
In the example above we set the column to start at 1 and increment by 1.
autoincrement and identity are synonymous with each other and the default value for start and increment, if not specified, is 1 for both.
To replace our existing colors table with the new table:
drop table colors;
alter table identity_column_example rename to colors;
Method 2: Using sequences
In the example above we only had one column, so specifying the column manually in the insert worked fine for our use case. But, sometimes existing tables have a lot of columns and we don’t want to have to specify each column, either to save time or also to avoid errors.
We can programatically add an autoincrement or identity field to a wide table, but we have to do it a little differently.
Let’s use an existing Snowflake sample data table to see why we can’t just alter the existing table:
create or replace table identity_column_example like snowflake_sample_data.tpch_sf1.customer;
alter table identity_column_example add column id int identity(1,1) not null;

insert into identity_column_example
select customer.*
from snowflake_sample_data.tpch_sf1.customer;
The main problem here and the reason we get an error is when we use customer.* the number of columns returned is one less than the new table we created. We can’t specify an empty value in a select statement, so we can’t force the identity column to populate in the way we want. We could specifiy the columns we want to populate manually, leaving out only the id column, but that’s what we are trying to avoid.
Let’s see what happens when we fill that column with an expression that auto-increments.
insert into identity_column_example
select customer.*,
       row_number() over (order by null)
from snowflake_sample_data.tpch_sf1.customer;
It works!!! BUT WAIT, let’s take a look at what happens when we insert a new record into the color table:
insert into identity_column_example(c_custkey, c_name, c_address, c_nationkey, c_phone, c_acctbal, c_mktsegment, c_comment)

values (219874, 'Customer#000219874', 'sadhjekj', 9, '19-505-461-2873', 999.99, 'asjdasgdj', 'sdadtyhkjer');

select * from identity_column_example order by id limit 3;
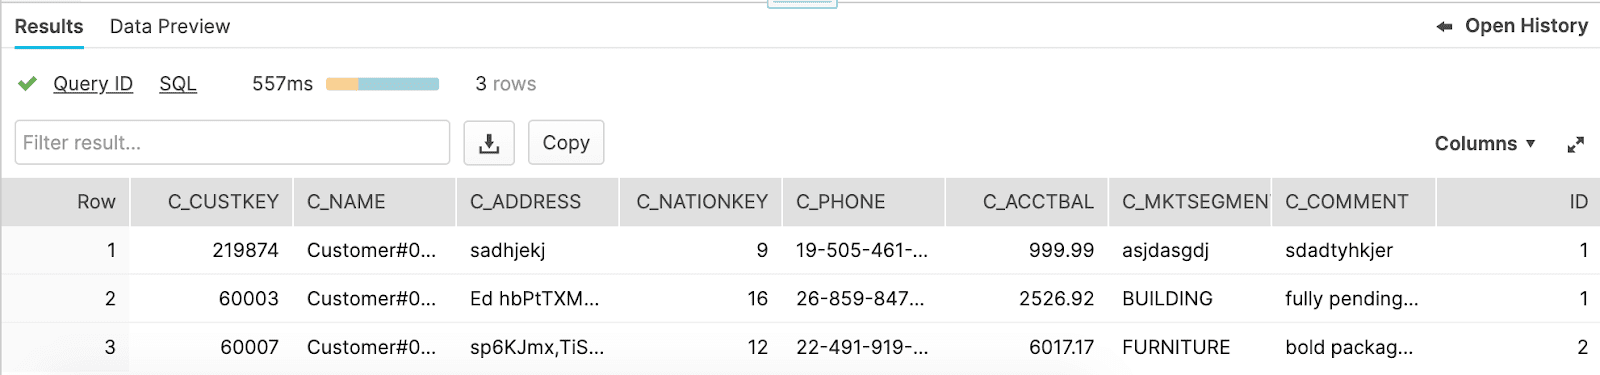
As you can see we have a duplicate value in our id field, because the identity column counter was never triggered, so when we insert a new record it starts over at 1.
In this case, we have to use a sequence. The identity and autoincrement default values use sequences under the hood, so we will be essentially recreating that functionality.
When we create our own sequence we have access to the next value in the sequence. This allows us to add the next incremental value when we backfill the new table with the old table.
First, we create a sequence that starts at 1 and increments by 1 and name it seq1 :
create sequence seq1 start=1 increment=1;Next, we’ll recreate our table and add a column id with the nextval of the seq1 sequence as the default:
create or replace table identity_column_example like snowflake_sample_data.tpch_sf1.customer;
alter table identity_column_example alter column id set default seq1.nextvalue;
Then, we can backfill the new table using nextval:
insert into identity_column_example
select customer.*,
       seq1.nextval
from snowflake_sample_data.tpch_sf1.customer;
Now, when we add a new record, the id column autoincrements properly and will remain unique:
insert into identity_column_example(c_custkey, c_name, c_address, c_nationkey, c_phone, c_acctbal, c_mktsegment, c_comment)

values (219874, 'Customer#000219874', 'sadhjekj', 9, '19-505-461-2873', 999.99, 'asjdasgdj', 'sdadtyhkjer');

select * from identity_column_example order by id limit 5;
We can drop the old table and rename the new table to replace it.
Continue reading
Check out: How to use subqueries and table expressions in Snowflake