Write Data into Snowflake
- How-Tos FAQs
- September 7, 2020

Write Data into Snowflake
While there are a dozen ways to push data into Snowflake depending on our use-case, the best way (IMHO) is using the put + copy commands, i.e. put the file from our external stage (or local disk) into the internal staging layer, followed by copy into target table command from the internal stage.
Let’s explore this via a quick example:
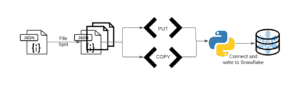
The above image depicts our high-level process for this article. Essentially, we are going to take a large JSON file, split it into multiple files. Then we are going to create put and copy commands, connect to Snowflake, and execute said commands.
_____________________________________________________________
We are taking the following excerpt from the article “The easiest way to split large JSON files”:
“We are taking a fairly large JSON dataset that we found on Kaggle, very kindly open-sourced by Yelp. More details on the dataset can be found here . In particular, we are looking at the “yelp_academic_dataset_user.json” file of size 3.6 GB. For the curious minds, the schema of the dataset looks like so:
{"user_id":"q_QQ5kBBwlCcbL1s4NVK3g"
"name":"Jane"
"review_count":1220
"yelping_since":"2005-03-14 20:26:35"
"useful":15038
"funny":10030
"cool":11291
"elite":"2006,2007,2008,2009,2010,2011,2012,2013,2014"
"friends":NULL}
Go ahead and download the dataset now, if you haven’t already.”
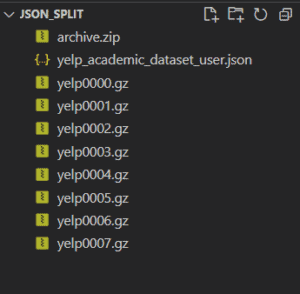
Open a bash terminal, navigate to the file’s location and run the following command:
cat yelp_academic_dataset_user.json | split -C 500000000 -d -a4 - yelp --filter='gzip > $FILE.gz'We are splitting a file every 500 million records, adding a file name prefix and suffix, and compressing the output file on the fly. Please note, this process takes around 5 minutes on a standard machine with 8GB RAM to generate 8 files averaging 200+ MB compressed. As per Snowflake documentation, 100-250 MB compressed is a good file size limit to load into Snowflake. More details can be found here .
_____________________________________________________________
Before we ingest our data into Snowflake, we must create a file format, stage, and table object.
--Creating a JSON file format
CREATE OR REPLACE FILE FORMAT TEST_1.PUBLIC.YELP_DATALOAD_FF
TYPE = 'JSON'
COMPRESSION = 'AUTO'
STRIP_OUTER_ARRAY = TRUE;
A file format is essentially used to describe the staged data files to load into Snowflake. Here, we are describing the file we’re about to load as below:
- Type=JSON : As the name suggests, we’re initializing the file format to be of type JSON
- Compression=Auto : We’re indifferent to the compression method Snowflake chooses
Strip_Outer_Array=True : The outer array of a JSON needs to be removed/stripped. More details on JSON outer arrays can be found here .
--Creating an internal Snowflake Managed stage where our files can be staged
CREATE OR REPLACE STAGE TEST_1.PUBLIC.YELP_DATALOAD_STAGE
FILE_FORMAT = (FORMAT_NAME = 'TEST_1.PUBLIC.YELP_DATALOAD_FF')
COPY_OPTIONS = (ON_ERROR = 'ABORT_STATEMENT', PURGE = TRUE);
A stage object in Snowflake is essentially used to “stage” files that are to be loaded or unloaded. Here we’re staging our files as below:
- File_Format : We’re using the file format of our choice (created earlier)
- On_Error=“ABORT_STATEMENT” : If there’s any error encountered while data loading or unloading, the statement is terminated/aborted
- Purge=TRUE : Once the data loading/unloading activity is completed, the staged file is purged
--Create statement to stage our yelp user data in a transient table
CREATE OR REPLACE TRANSIENT TABLE TEST_1.PUBLIC.Yelp_Users_Stg
(
  Yelp_User_Data VARIANT
);
We are creating a transient table in order to prevent fail-safe storage costs. Also, this table will have only 1 column of Variant data types that stages the raw JSON data.
--Creating a table to store our yelp user data
CREATE OR REPLACE TABLE TEST_1.PUBLIC.Yelp_Users
(
  User_Id STRING,
  Name STRING,
  Review_Count NUMBER,
  Yelping_Since TIMESTAMP_NTZ(9),
  Useful NUMBER,
  Funny NUMBER,
  Cool NUMBER,
  Elite STRING,
  Friends STRING
);
Now, we create a simple target table to hold all of our data.
_____________________________________________________________
Let’s create our Snowflake put and copy statements
put_statement = (
    "put file://d:\\Python\\wd\\json_split\\*.gz @TEST_1.PUBLIC.YELP_DATALOAD_STAGE"
)
copy_statement = (
    "COPY INTO TEST_1.PUBLIC.Yelp_Users_Stg FROM @YELP_DATALOAD_STAGE PATTERN = '.*gz'"
)
Now that we have all of our pre-requisite statements ready, let’s establish a connection to Snowflake using the Python Snowflake Connector. If you haven’t done the setup for this, please visit the article here titled “Get snowflake results in Pandas DataFrame”, to do so.

Let’s activate the virtual environment snowflake_to_pands_df (your name may vary). Let’s also check and confirm the current Python version. Please note, some of the following scripts have been taken directly from the other article as mentioned above.
# Importing required libraries
import sys
import os
# import pandas as pd  # Not required for this article
import snowflake.connector as sf


# Creating a simple Python to Snowflake connector function
def snowflake_connection():
    # Initializing Snowflake Connectivity variables
    account = os.environ.get("snowflake_account")
    user = os.environ.get("snowflake_user")
    password = os.environ.get("snowflake_secret")
    warehouse = "COMPUTE_WH"
    role = "SYSADMIN"
    # Catching exceptions crudely
    try:
        connection = sf.connect(
            account=account,
            user=user,
            password=password,
            warehouse=warehouse,
            role=role,
        )
    except Exception as error:
        error = sys.exc_info()[0]
        message = sys.exc_info()[1]
        print(f"Error: {error}\nMessage: {message}")
    # Returning connection object
    return connection
This simple script or its function underneath is going to help us establish a Snowflake connection object.
# Creating the put and copy statements
put_statement = (
    "put file://d:\\Python\\wd\\json_split\\*.gz @TEST_1.PUBLIC.YELP_DATALOAD_STAGE"
)
copy_statement = (
    "COPY INTO TEST_1.PUBLIC.Yelp_Users_Stg FROM @YELP_DATALOAD_STAGE PATTERN = '.*gz'"
)
Let’s create our put and copy statements. Our Python reverts to windows path format. If you are on Unix please be sure to add three slashes as below:
put file:///d/Python/wd/...# Establish a Snowflake connection
try:
get_connection = snowflake_connection()
cur = get_connection.cursor()
print("Connection successfully establish with Snowflake")
except Exception as error:
error = sys.exc_info()[0]
message = sys.exc_info()[1]
print(f"Error: {error}\nMessage: {message}")Connection successfully establish with SnowflakeNow let’s establish our Snowflake connection by creating the connection object ‘get_connection’, following which we will extract its cursor object, namely, ‘cur’.
# Execute the put statement
try:
    cur.execute(put_statement).fetchall()
    print("Put Statement successfully executed")
except Exception as error:
    error = sys.exc_info()[0]
    message = sys.exc_info()[1]
    print(f"Error: {error}\nMessage: {message}")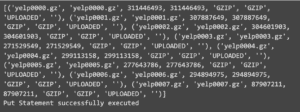
Now, we are executing the put statement to stage all of our files within the Snowflake managed internal stage.
# Execute the copy statement
try:
    cur.execute(copy_statement).fetchall()
    print("Copy Statement successfully executed")
except Exception as error:
    error = sys.exc_info()[0]
    message = sys.exc_info()[1]
    print(f"Error: {error}\nMessage: {message}")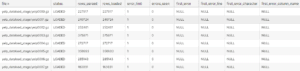
And then, we are going to execute the copy statements that will import data from our JSON staged files in ‘TEST_1.PUBLIC.YELP_DATALOAD_STAGE’ into our table ‘TEST_1.PUBLIC.Yelp_Users_Stg’.
# Closing the connection
get_connection.close()
Last, but definitely not least, go ahead and close the cursor.
_____________________________________________________________
SELECT *
FROM TEST_1.PUBLIC.Yelp_Users_Stg
LIMIT 10;
Let’s run a simple SELECT * on this table and get the first couple of records to see how this staging table looks. You’ll note that all of this data is in a ‘Variant’ data type column which essentially stores JSON as it is. From a tabular point of view, it does not make much sense.
SELECT YELP_USER_DATA:"user_id"::STRING AS User_Id,
YELP_USER_DATA:"name"::STRING AS Name,
YELP_USER_DATA:"review_count"::STRING AS Review_Count,
YELP_USER_DATA:"yelping_since"::STRING AS Yelping_Since,
YELP_USER_DATA:"useful"::STRING AS Useful,
YELP_USER_DATA:"funny"::STRING AS Funny,
YELP_USER_DATA:"cool"::STRING AS Cool,
YELP_USER_DATA:"elite"::STRING AS Elite,
YELP_USER_DATA:"friends"::STRING AS Friends
FROM TEST_1.PUBLIC.Yelp_Users_Stg
LIMIT 10;
We are going to parse this JSON file into a more structured dataset using native Snowflake functions. And that is how you write data into Snowflake.
Up Next:
Learn how to Get Snowflake Results in Pandas DataFrame