Installing Datameer with MapR on an Edge Node
If Datameer is installed on an edge node and has to be connected with MapR, you also need to install the MapR client software on the edge node, so the node has access to the MapR cluster.
If it is possible to install the Datameer instance on the cluster (e.g. for a PoC), you can save the steps for preparing the edge node and proceed with the steps after the node has been prepared as a MapR client (Datameer install).
Preparing the Edge Node
On the edge node, install the MapR client software as well as the Datameer software.
Downloading the required files
Download the following files:
- Oracle JDK 1.8, from the Oracle Web
- The latest MySQL connector J to install a live instance of datameer
- Datameer zip file for MapR 5.0.0
If you don't have a browser on the virtual machine, you should send these files to it using ftp. To install an ftp server on CentOS do the following:
- Enter
#yum install vsfptd. - Answer with y to the question "Is this ok y/N?"
- Start the fpt server.
- Enter
#service vsftpd start.
Transfer files to the virtual machine using your favorite ftp client. You can't transfer files using the user root. If you created a CentOS virtual machine, you have another user available to transfer files.
Install the Oracle JDK
In the folder where you saved the downloaded files, type:
#rpm -Uvh jdk-7u79-linux-64.rpm (or the file name of the .rpm file you downloaded)
To check that Java was installed correctly, enter:
#java -version
If it worked correctly, the output should be something similar to:
java version "1.7.0_79"
Java(TM) SE Runtime Environment (build 1.7.0_79-b15)
Java HotSpot(TM) 64-Bit Server virtual machine (build 24.79-b02, mixed mode)
Install the MapR client software
First, you need to manually create a MapR repository.
Create a file called
maprtech.repowith the following content:MapR repo file[maprtech] name=MapR Technologies baseurl=http://package.mapr.com/releases/v5.0.0/redhat enabled=1 gpgcheck=0 protected=1
The baseurl parameter should be the release folder, which matches the version of the your MapR cluster.
- Copy the
maprtech.repofile into the/etc/yum.repos.dfolder. Install the MapR client with the following command:
#yum install mapr-client
Answer with y to the question "Is this ok y/n:"
This action installs the MapR client and all the dependencies for it to work. The output of the install is similar to this:
Running Transaction
Warning: RPMDB altered outside of yum.
  Installing : syslinux-nonlinux-4.04-3.el6.noarch                                                                                        1/3
  Installing : syslinux-4.04-3.el6.x86_64                                                                                                 2/3
  Installing : mapr-client-5.0.0.32987.GA-1.x86_64                                                                                        3/3

To configure default settings: run configure.sh (as root), using the -C (uppercase)
 option to specify the CLDB nodes of the default cluster, and the -c (lowercase) option
 to specify that it is a client configuration
  /opt/mapr/server/configure.sh [-N <cluster name>] -c -C <CLDB node>[:<port>][,<CLDB node>[:<port>]...]

To use this client with a secure cluster, add the -secure option to the configure.sh
  /opt/mapr/server/configure.sh [-N <cluster name>] -secure -c -C <CLDB node>[:<port>][,<CLDB node>[:<port>]...]
  Verifying  : mapr-client-5.0.0.32987.GA-1.x86_64                                                                                        1/3
  Verifying  : syslinux-4.04-3.el6.x86_64                                                                                                 2/3
  Verifying  : syslinux-nonlinux-4.04-3.el6.noarch                                                                                        3/3

Installed:
  mapr-client.x86_64 0:5.0.0.32987.GA-1

Dependency Installed:
  syslinux.x86_64 0:4.04-3.el6                                      syslinux-nonlinux.noarch 0:4.04-3.el6

Complete!
There is some information about how to configure the client in this output, is useful for the next step.
Configure the MapR client software
- Add the IP address of the MapR server into the /etc/hosts file of the CentOS virtual machine. If you have several CLDB nodes, the IP addresses of all of them should be entered in the
/etc/hostsfile. Edit the
/etc/hostsfile and add the addresses. The result should be similar to this:CentOS VM /etc/hosts127.0.0.1 localhost 192.168.x.z datameer 192.168.x.y maprdemo
Use the following command from the mapr-client install:
/opt/mapr/server/configure.sh [-N <cluster name>] -c -C <CLDB node>[:<port>][,<CLDB node>[:<port>]...]
Find the cluster name and CLDB node name from the /opt/mapr/conf/mapr-clusters.conf file on a node from the MapR cluster.
For example, in the MapR sandbox the content of mapr-clusters.conf is:
demo.mapr.com secure=false maprdemo:7222
In this example, the cluster name is demo.mapr.com and the CLDB name is on maprdemo.
With these names, execute the following command on the CentOS client, with multiple nodes separated by a comma:
#/opt/mapr/server/configure.sh -N demo.mapr.com -c -C maprdemo
Check that the client can communicate with the cluster using the following commands:
# yarn node -list
16/04/22 18:17:02 INFO client.MapRZKBasedRMFailoverProxyProvider: Updated RM address to maprdemo/192.168.2.215:8032
Total Nodes:1
         Node-Id         Node-State    Node-Http-Address    Number-of-Running-Containers
  maprdemo:57841            RUNNING        maprdemo:8042                               0
# hadoop fs -ls /
Found 8 items
drwxr-xr-x   - 2000 2000          1 2015-08-26 01:14 /apps
drwxr-xr-x   - 2000 2000          0 2015-08-26 00:58 /hbase
drwxrwxrwx   - 2000 2000          2 2016-04-22 16:15 /oozie
drwxr-xr-x   - 2000 2000          0 2015-08-26 01:01 /opt
drwxr-xr-x   - root root          0 2015-08-26 01:11 /tables
drwxrwxrwx   - 2000 2000          0 2015-08-26 00:58 /tmp
drwxr-xr-x   - 2000 2000          7 2015-08-26 01:14 /user
drwxr-xr-x   - 2000 2000          1 2015-08-26 00:59 /var
If both the YARN command and the Hadoop fs command work, this means you have communicated with the resource manager and with the MapR file system.
You can now go on with the Datameer installation
Installing Datameer on MapR
Refer to Set Up Datameer on MapR and the Installation Guide for this section.
When creating a user, make sure the UUID is above 500. To do so, use the following command to specify UUIDS when creating users:
# useradd --system -m -gid datameer --uid 502 datameer
Configuring Datameer
First, create a folder on the maprfs for the user datameer by entering the following command in the command line:
# hadoop fs -mkdir /user/datameer
# hadoop fs -chown -R datameer:datameer /user/datameer
# hadoop fs -ls /user
Found 8 items
drwxr-xr-x   - datameer datameer          6 2016-04-22 19:49 /user/datameer
drwx------   - 2003     2000              3 2015-08-26 01:14 /user/hbaseuser
drwxr-xr-x   - 2000     2000              1 2015-08-26 01:10 /user/hive
drwxr-xr-x   - 2000     2000              1 2015-08-26 01:12 /user/mapr
drwx------   - 2004     2000              3 2015-08-26 01:14 /user/mruser
drwxr-xr-x   - root     root              0 2015-08-26 01:14 /user/root
drwx------   - 2001     2000              3 2015-08-26 01:14 /user/user01
drwx------   - 2002     2000              3 2015-08-26 01:14 /user/user02
The last command verifies that the folder you created exists and that the permissions are correctly set.
For the communication between Datameer and MapR to work, you need to define a datameer user on the MapR cluster as well. If this is not done, the cluster can't execute the commands coming from an unknown user.
To do so, use the same commands you used to create the user datameer on the CentOS virtual machine for Datameer, but this time on the MapR:
# groupadd --system datameer
# useradd --system -m -gid datameer --uid 502 datameer
Make sure the UUID is higher than 500.
MapR multi-node cluster
On a MapR multi-node cluster the group datameer and the user datameer must be defined in every node. This is already done if you are using Active Directory with a PAM to control the user access to the cluster. If not, create the user datameer manually on each node.
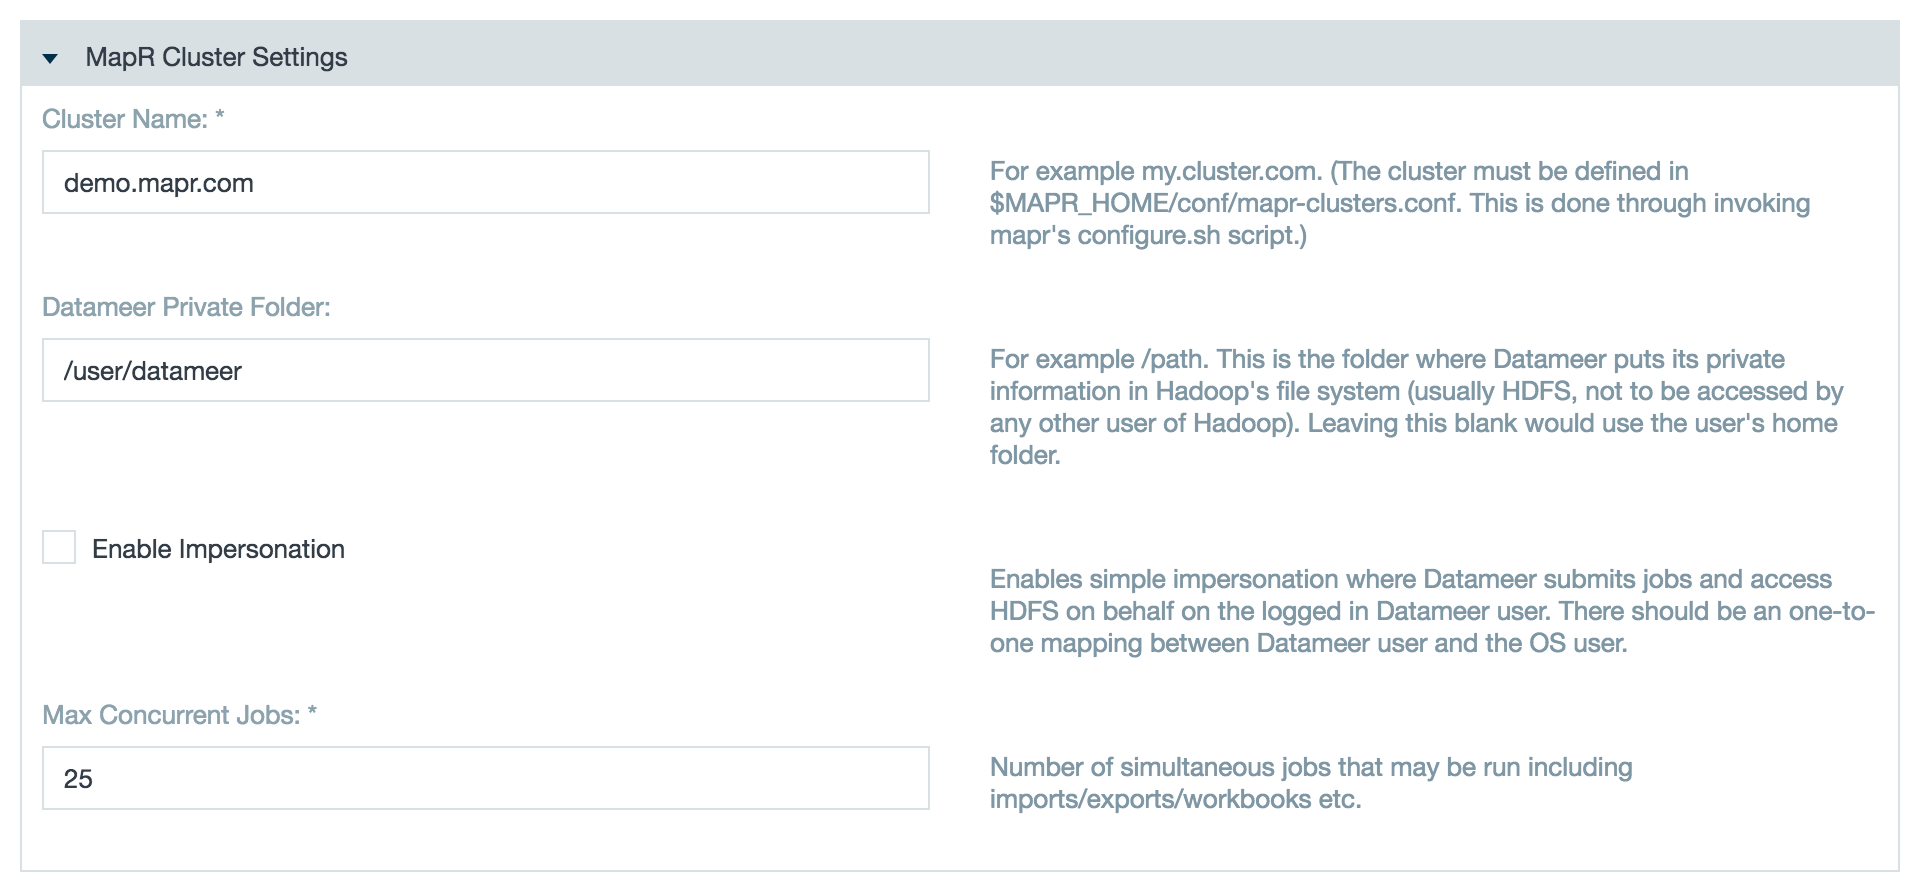
- In Datameer, go to the Admin tab and select Hadoop Cluster.
- Change the Cluster Mode to MapR.
- In the Datameer Private Folder field, enter /user/datameer.
- Enter the cluster name in the Cluster Name field.
To add custom properties, you need to know where the native libraries are saved.
Find out where native libraries are saved by using the following command:
# hadoop checknative
16/04/22 20:32:44 WARN bzip2.Bzip2Factory: Failed to load/initialize native-bzip2 library system-native, will use pure-Java version
16/04/22 20:32:44 INFO zlib.ZlibFactory: Successfully loaded & initialized native-zlib library
Native library checking:
hadoop:  true /opt/mapr/hadoop/hadoop-2.7.0/lib/native/libhadoop.so.1.0.0
zlib:    true /lib64/libz.so.1
snappy:  true /opt/mapr/hadoop/hadoop-2.7.0/lib/native/libsnappy.so.1
lz4:     true revision:99
bzip2:   false
openssl: false Cannot load libcrypto.so (libcrypto.so: cannot open shared object file: No such file or directory)!
The native libraries are shown:
hadoop: true /opt/mapr/hadoop/hadoop-2.7.0/lib/native/libhadoop.so.1.0.0
The folder for the native libraries is:
/opt/mapr/hadoop/hadoop-2.7.0/lib/native
In Default Hadoop Properties comment out the following properties so you can define them in custom properties:
#mapreduce.output.fileoutputformat.compress=true
#mapreduce.output.fileoutputformat.compress.type=BLOCK
#mapreduce.map.output.compress=true
#mapred.map.output.compression.type=BLOCK
In Hadoop Distribution Specific Properties (mapr-5.0.0-mr2), comment out the following properties so you can define them in custom properties:
#mapreduce.output.fileoutputformat.compress=false
#mapreduce.map.output.compress=false
#tez.runtime.compress=false
In Custom Properties, enter the following:
das.tez.session-pool.max-idle-time=6s
tez.shuffle-vertex-manager.desired-task-input-size=52428800
ipc.maximum.data.length=134217728
tez.am.launch.env=LD_LIBRARY_PATH=$LD_LIBRARY_PATH:/opt/mapr/hadoop/hadoop-2.7.0/lib/native
tez.task.launch.env=LD_LIBRARY_PATH=$LD_LIBRARY_PATH:/opt/mapr/hadoop/hadoop-2.7.0/lib/native
yarn.app.mapreduce.am.env=LD_LIBRARY_PATH=$LD_LIBRARY_PATH:/opt/mapr/hadoop/hadoop-2.7.0/lib/native
io.compression.codecs=org.apache.hadoop.io.compress.DefaultCodec,org.apache.hadoop.io.compress.GzipCodec,
org.apache.hadoop.io.compress.BZip2Codec,org.apache.hadoop.io.compress.SnappyCodec
tez.runtime.compress=true
tez.runtime.compress.codec=org.apache.hadoop.io.compress.SnappyCodec
mapreduce.map.output.compress=true
mapreduce.output.fileoutputformat.compress=true
mapreduce.output.fileoutputformat.compress.type=BLOCK
mapreduce.output.fileoutputformat.compress.codec=org.apache.hadoop.io.compress.SnappyCodec
mapreduce.map.output.compress.codec=org.apache.hadoop.io.compress.SnappyCodec
You also need to find the native libraries to make sure small jobs don't fail.
Find which native libraries Datameer is using by entering the following:
# sudo -u datameer bin/conductor.sh check
Found JAVA=/usr/java/jdk1.7.0_79/jre/bin/java in JAVA_HOME=/usr/java/jdk1.7.0_79
Java 7 found
DeployMode: live
DAS Options:
Java native libraries:
Checking arguments to Jetty:
JETTY_HOME     =  /usr/local/Datameer-5.11.13-mapr-5.0.0-mr2
JETTY_CONF     =  /usr/local/Datameer-5.11.13-mapr-5.0.0-mr2/etc/jetty.conf
JETTY_RUN      =  /tmp
JETTY_PID      =  /tmp/jetty-dap.pid
JETTY_LOGS     =
CONFIGS        =  /usr/local/Datameer-5.11.13-mapr-5.0.0-mr2/etc/jetty.xml
JAVA           =  /usr/java/jdk1.7.0_79/jre/bin/java
JAVA_OPTIONS   =  -Xmx2048m -XX:MaxPermSize=384m -Xms256m -XX:MaxNewSize=448m -XX:SurvivorRatio=6 -XX:+UseConcMarkSweepGC -XX:CMSInitiatingOccupancyFraction=80 -XX:+HeapDumpOnOutOfMemoryError -XX:+CMSClassUnloadingEnabled -XX:+CMSPermGenSweepingEnabled -Dfile.encoding=utf-8 -server -Ddeploy.mode=live
CLASSPATH      =
Jetty running pid=4997
In this example, the line starting with "Java native libraries:" indicates that no native libraries were loaded.
To make available the MapR native libraries, copy the folder where the mapr native libraries are located into <datameer home folder>/lib.
# cp -r /opt/mapr/hadoop/hadoop-2.7.0/lib/native ./lib
After this, restart Datameer:
# sudo -u datameer bin/conductor.sh restart
Found JAVA=/usr/java/jdk1.7.0_79/jre/bin/java in JAVA_HOME=/usr/java/jdk1.7.0_79
Java 7 found
DeployMode: live
DAS Options:
Java native libraries: /usr/local/Datameer-5.11.13-mapr-5.0.0-mr2/lib/native
Note: The variable DAS_PORT overrides the port 8080 defined by jetty.port in start.ini
Starting jetty using port 8443
Stopping Jetty: OK
Starting Jetty: STARTED Jetty Mon May  2 10:26:41 CEST 2016 under PID 5595
In this example, the Datameer virtual machine found the native libraries. Executing a small job now works correctly.
Native Libraries with MapR
The native libs for MapR Hadoop distribution change frequently within minor version, so Datameer packages built for MapR Hadoop distributions doesn't include native libs.
Other distributions like Cloudera or HDP have a native folder within the <datameer home folder>/lib, so with these other distributions it isn't required to add the native libraries (in most cases) to get the compression working properly.